Konzept, Chapter 2: Inline Styles
In the previous chapter, we have successfully set up a very basic text editor, which allows you to add, edit and remove text. Now it's time to deal with some inline stylings, such as bold, italics and more. In the lingo of Slate, these things are called Marks.
Marks are going to be part of the Text type. Let's extract all the types into a types.tsx, and then we change the type definition for Text as follows:
type Text = {
  text: string;
  bold?: boolean;
  italic?: boolean;
  strikethrough?: boolean;
  highlight?: boolean;
};
Our strategy will be that for every mark that can be applied to a text, we have a separate boolean set to true. These booleans are optional - we don't require them to be around on every text node, instead we only want them to be there when we want the formatting to be applied.
This change didn't do anything though, we need a way to enable these marks. We're going to implement three different ways of doing so:
- Hotkeys like
cmd+b - Markdown-like shortcuts like
*this* - A hovering toolbar
Let's start with the easiest one first.
Adding Hotkey support
For hotkeys, we're going to add a handler to the onKeyDown event of the editable. We're going to use the onKeyDown event for a few other things in the future, so our handlers will be functions which return a boolean, where returning true means that this handler has sufficiently handled the event and no other handler should be called, whereas false means that the event was not handled. We'll also call preventDefault on the event if it was handled, and ignore it otherwise.
Let's build all this up now.
We start by setting up the onKeyDown-handler and plugging it into the Editable:
function onKeyDown(event: KeyboardEvent, editor: Editor) {
  let handled = handleHotkeys(event, editor);
  if (handled) {
    event.preventDefault();
  }
}
export default function Konzept() {

  // ...
  <Editable
          spellCheck
          autoFocus
          onKeyDown={(event) => onKeyDown(event, editor)}
  />
  // ...
}
handleHotkeysgoes into a separate handleHotkeys.tsx, which, at this point, looks pretty uneventful:
import { KeyboardEvent } from "react";
import { Editor } from "./types";

export default function handleHotkeys(
  event: KeyboardEvent,
  editor: Editor
): boolean {
  return false;
}
For the actual hotkey handling, we're going to declare what a Mark is in our types.tsx:
export type Mark = "bold" | "highlight" | "italic" | "strikethrough" ;
We use this type to build up a mapping between a hotkey and the mark we want it to toggle. We add this in our handleHotkeys.tsx:
const HOTKEYS_MARKS_MAP: Record<string, Mark> = {
  "mod+b": "bold",
  "mod+i": "italic",
  "mod+shift+b": "highlight",
  "mod+shift+x": "strikethrough",
};
To detect hotkeys, we install is-hotkey, which is actually recommended by Slate (Hotkey detecting for our use case isn't super hard though, you can easily make do without a 3rd party plugin):
npm install is-hotkey
We will now use this to extend handleHotkeys as follows:
export default function handleHotkeys(
  event: KeyboardEvent,
  editor: Editor
): boolean {
  for (const hotkey in HOTKEYS_MARKS_MAP) {
    if (isHotkey(hotkey, event)) { // This comes from the lib we just added
      const mark = HOTKEYS_MARKS_MAP[hotkey];
      toggleMark(editor, mark);
      return true;
    }
  }
  return false;
}
Now let's implement toggleMark. Now, theoretically there is a catch: If a hotkey is pressed, we want all the following text to have that mark - but only if no text is selected. If some text is selected, though, we want that text to change its formatting instead.
Practically, this makes no difference, as the methods from Slate we're going to use already account for that. It's still worth mentioning, though, since the question whether or not a selection is active has a huge impact on whatever we are going to implement.
This is the implementation:
import { Editor as SlateEditor } from "slate";

//...

function switchMark(editor: Editor, mark: Mark, on: boolean) {
  if (on) {
    SlateEditor.addMark(editor, mark, true);
  } else {
    SlateEditor.removeMark(editor, mark);
  }
}

function isMarkActive(editor: Editor, mark: Mark) {
  const marks = SlateEditor.marks(editor);
  return marks ? marks[mark] === true : false;
}

function toggleMark(editor: Editor, mark: Mark) {
  const isActive = isMarkActive(editor, mark);
  switchMark(editor, mark, !isActive);
}
The Slate functions we use are pretty straightforward so far: SlateEditor.marks retrieves the active marks, removeMark unsets a given mark, and addMark sets it to a given value (In our case, all marks are booleans, so we pass true).
If we now play around with our editor, we can see that everything works nicely: The marks are set and unset as we expect it, and Slate automatically splits and merges text nodes appropriately based on the nodes which are and are not active.
There is only a minor snag: We don't actually see any change in our text. Let's fix that next.
Rendering Text Nodes
Slate's Editable exposes three rendering methods to us: One to render Elements - which we will use in a later chapter, one to render a custom placeholder and one to render text nodes, slightly confusingly named renderLeaf.
Let's create a new renderLeaf.tsx with the new code, and hook it into the Editable:
//renderLeaf.tsx
import { RenderLeafProps } from "slate-react";

export default function renderLeaf({
  attributes,
  children,
  leaf,
}: RenderLeafProps) {
  let enrichedChildren = children;
  if (leaf.bold) {
    enrichedChildren = <strong>{enrichedChildren}</strong>;
  }
  if (leaf.italic) {
    enrichedChildren = <em>{enrichedChildren}</em>;
  }
  if (leaf.strikethrough) {
    enrichedChildren = <s>{enrichedChildren}</s>;
  }
  if (leaf.highlight) {
    enrichedChildren = <mark>{enrichedChildren}</mark>;
  }
  return <span {...attributes}>{enrichedChildren}</span>;
}

//index.tsx
//...
import renderLeaf from "./renderLeaf";
//...
export default function Konzept() {
 //...
        <Editable
          spellCheck
          autoFocus
          renderLeaf={renderLeaf} //this hooks in the new function
          onKeyDown={(event) => onKeyDown(event, editor)}
        />
 //...
}
The renderLeaf function gets passed three important objects:
leafis the actual text node you can also see in theJSON.stringifyed output of the editor value. We use this one to decide which formatting to add.childrenis a React element that encapsulates the text elementattributesis an object that we need to pass to the actual dom node that will hold the leaf. Without it, Slate won't be able to map the position of the leaf in the DOM to the position of the leaf in its internal state.
When you play around with the editor now, you'll notice that the text formats as expected. Nice! Pay attention to the fact that text nodes can have multiple formats, such as being bold and highlighted at the same time. Our implementation handles this without any issue.
Adding Markdown-Like Shortcuts
Our users are now able to use hotkeys, but we also want them to be able to use markdown-like shortcuts. There are multiple ways of achieving this - ours will be to check on every text input if a shortcut is present, deleting the shortcut and then formatting the text.
We will do this in our first extension: withShortcuts. As mentioned before, Slate is extended by providing a function which takes an Editor, enriches it and returns it again. We'll start with a simple extension which doesn't do anything:
//withShortcuts.tsx
import { Editor } from "slate";

export default function withShortcuts(editor: Editor) {
  const { insertText } = editor;
  editor.insertText = (text: string) => {
    insertText(text);
  };
  return editor;
}

//index.tsx
import withShortcuts from "./withShortcuts";
//...

export default function Konzept() {
 //...
 const editor = useMemo(() => withShortcuts(withReact(createEditor())), []);
 //...
}
All our extension does at this point is taking the editor's original implementation of insertText, replacing it with a function which ...simply calls the original function again. Not very useful.
Let's crank this up a notch. First, we need to know which shortcuts we will use for which Mark. We define it like this:
//withShortcuts.tsx
const SHORTCUT_MARK_MAP: Readonly<{
  [key: string]: Mark;
}> = {
  ":": "highlight",
  "\\*": "bold",
  _: "italic",
  "~": "strikethrough",
};
Note that this is similar, but not the same as markdown. Now, let's extend withShortcuts to call a yet-to-be-defined function called handleInlineShortcuts:
export default function withShortcuts(editor: Editor) {
  const { insertText } = editor;
  editor.insertText = (text: string) => {
    insertText(text);
    const { selection } = editor;
    if (text !== " " || !selection || Range.isExpanded(selection)) {
      return;
    }
    handleInlineShortcuts(editor);
  };
  return editor;
}
This function still calls insertText immediately, as at no point of our implementation we would want to prevent the text to be inserted. Then, we check for three things:
- If the text that was just inserted is anything other than a space, we don't want to trigger our function, as we want our shortcuts to only trigger after a space has been hit.
- If there is no selection in the editor, we also do not want to do anything.
- And lastly, if the selection is expanded, we don't want to do anything either.
The last two entries are a bit counterintuitive if you're unfamiliar with what a selection is from the perspetive of Slate. A selection has a start and a finish. and everything between these two values is considered to be selected. However, if start and finish are the same, e.g. when you are simply starting at the | of the editor, then Slate considers this also to be a valid selection. Therefore, the second check only ensures that the cursor is placed somewhere in the editor.
And the third check verifies that the selection is not expanded, or in other words: that start and end are the same and we are only dealing with a caret. We wouldn't know how to deal with the input otherwise, so we'll guard us against this case.
Now let's take a look at handleInlineShortcuts:
function handleInlineShortcuts(editor: Editor) {
  Array.from(
    SlateEditor.nodes(editor, { match: (n) => Text.isText(n) })
  ).forEach(([node, path]) => {
    let { text } = node as Text;
    for (const escapedKey in SHORTCUT_MARK_MAP) {
      const mark = SHORTCUT_MARK_MAP[escapedKey];
      const regexString = escapedKey + "(.+?)" + escapedKey;
      Array.from(text.matchAll(new RegExp(regexString, "g"))).forEach(
        (match) => {
          const [, value] = match;
          const { index } = match;
          if (index === undefined || !value.length) {
            return;
          }
          console.log(mark, value, index, path);
        }
      );
    }
  });
}
Since we're dealing with a couple of iterations here, I have seperated the code which detects something from the code which does something (which will come in the next step). This helps us understanding what is going on here, as this also introduces a new Slate concept to us: Matching.
SlateEditor.nodes returns all notes which match certain criteria. If not defined otherwise, it returns the nodes in the current selection, which is exactly what we want in this case. However, it would also return the paragraph node we're currently in, which is not what we want, so we pass a function via the match parameter, which comes from Slate and checks if a node is a Text node. In other words, we're selecting all text nodes in the current selection, and are iterating over them (In fact, since the selection is collapsed, there should ever only be one text node!). We use Array.from to convert the Generator which is returned by Slate into an Array, and then we iterate over it.
The type of each element in the iterator is NodeEntry<Node>, which is a pair of Node, Path, where Node is the matching node and Path is its path within Slate. Thanks to our match, we already know the Node is a Text, so we cast it as such and access its text property.
Next, we iterate over all our shortcuts, build a regex that matches the pattern we're after and check if there is a match in the current text node. If we found a match, we log it for now.
If you played around with the editor in the previous steps, you'll notice that a sentence, or even a word, can be spread across multiple text nodes, if the formatting differs (e.g. if the word starts in bold but ends in italic). This means that with our current implementation, we won't catch shortcuts in text which is split across multiple nodes.
Now, let's do something more than just logging stuff.
//withShortcuts.tsx
import { Editor as SlateEditor, Range, Text, Transforms, Point } from "slate";
// ...

function handleInlineShortcuts(editor: Editor) {
  Array.from(
    SlateEditor.nodes(editor, { match: (n) => Text.isText(n) })
  ).forEach(([node, path]) => {
    let { text } = node as Text;
    for (const escapedKey in SHORTCUT_MARK_MAP) {
      const mark = SHORTCUT_MARK_MAP[escapedKey];
      const regexString = escapedKey + "(.+?)" + escapedKey;
      Array.from(text.matchAll(new RegExp(regexString, "g"))).forEach(
        (match) => {
          const [, value] = match;
          const { index } = match;
          if (index === undefined || !value.length) {
            return;
          }
          const selectionOffset = editor.selection!.anchor.offset;
          const lastMatchingCharOffset = index + value.length + 2;
          if (selectionOffset - 1 !== lastMatchingCharOffset) {
            return;
          }
          let beginning: Point = {
            path: path,
            offset: index,
          };

          Transforms.delete(editor, { at: beginning });

          let end = {
            path: path,
            offset: index + value.length,
          };
          Transforms.delete(editor, { at: end });
          let up          update[mark] = true;
          Transforms.setNodes(editor, update, {
            at: {
              anchor: beginning,
              focus: end,
            },
            match: (n) => Text.isText(n),
            split: true,
          });
        }
      );
    }
  });
}
Let's go through this change one by one.
First, we are getting a value called selectionOffset. As explained above, a selection consists of two points within the editor, a starting and a finish point, in the lingo of Slate called anchor and focus. Since we have already checked that the selection is valid and that it is collapsed, we can assume that anchor === focus and can pick any of the two for our purposes. The offset of the selection basically tells us how many characters within a text node we currently are.
lastMatchingCharOffset starts with the index of the match - in other words, the beginning of the word we're potentially going to mark. Then we add the length of the match itself, and 2 to account for the two placeholders (which are already stripped out of value), to end right behind the last placeholder of the word.
Then we compare this to the selection offset (subtracting one to account for the whitespace we have just inserted with insertText). If they match, then the word from the regex is actually the last word behind the caret. Which is exactly what we want - we don't want to randomly format words somewhere else in the text.
Now that we're convinced we have to mark something, we start by constructing a slate Point. We do so by passing the path of the text node we're currently in, and the offset at which we want to delete - which is the index of the match. We then call Transforms.delete on it, effectively deleting the first shortcut.
Similarly, we construct an end point to delete the second shortcut, taking into account that the first shortcut is already deleted (otherwise, we would have to add 1 to the offset).
Finally, we call Transforms.setNodes, passing four parameters: at is the location at which we want to do a change. We provide this as a range from beginning to end, which, now that we deleted the enclosing shortcuts, only contains the words or characters to be highlighted. update is a JSON object which contains the mark as a key, and true as the value - for example, if we want to make text bold, update would be equal to { bold: true }.
What setNodes does is that it merges all the affected nodes with update, setting all keys provided by update to the new value, leaving all other keys unchanged. By passing match, we ensure only text nodes are being changed, and not e.g. the paragraph node.
But wait a second, we don't always want to change the entire Text node! If the text is some *bold* string, we only want to change the middle part of the text node, leaving some and string unchanged! That is what split: true is for - if it's necessary to split a text node for the update, it will do so.
Highlighting text with shortcuts now works, and I encourage you to play around with it!
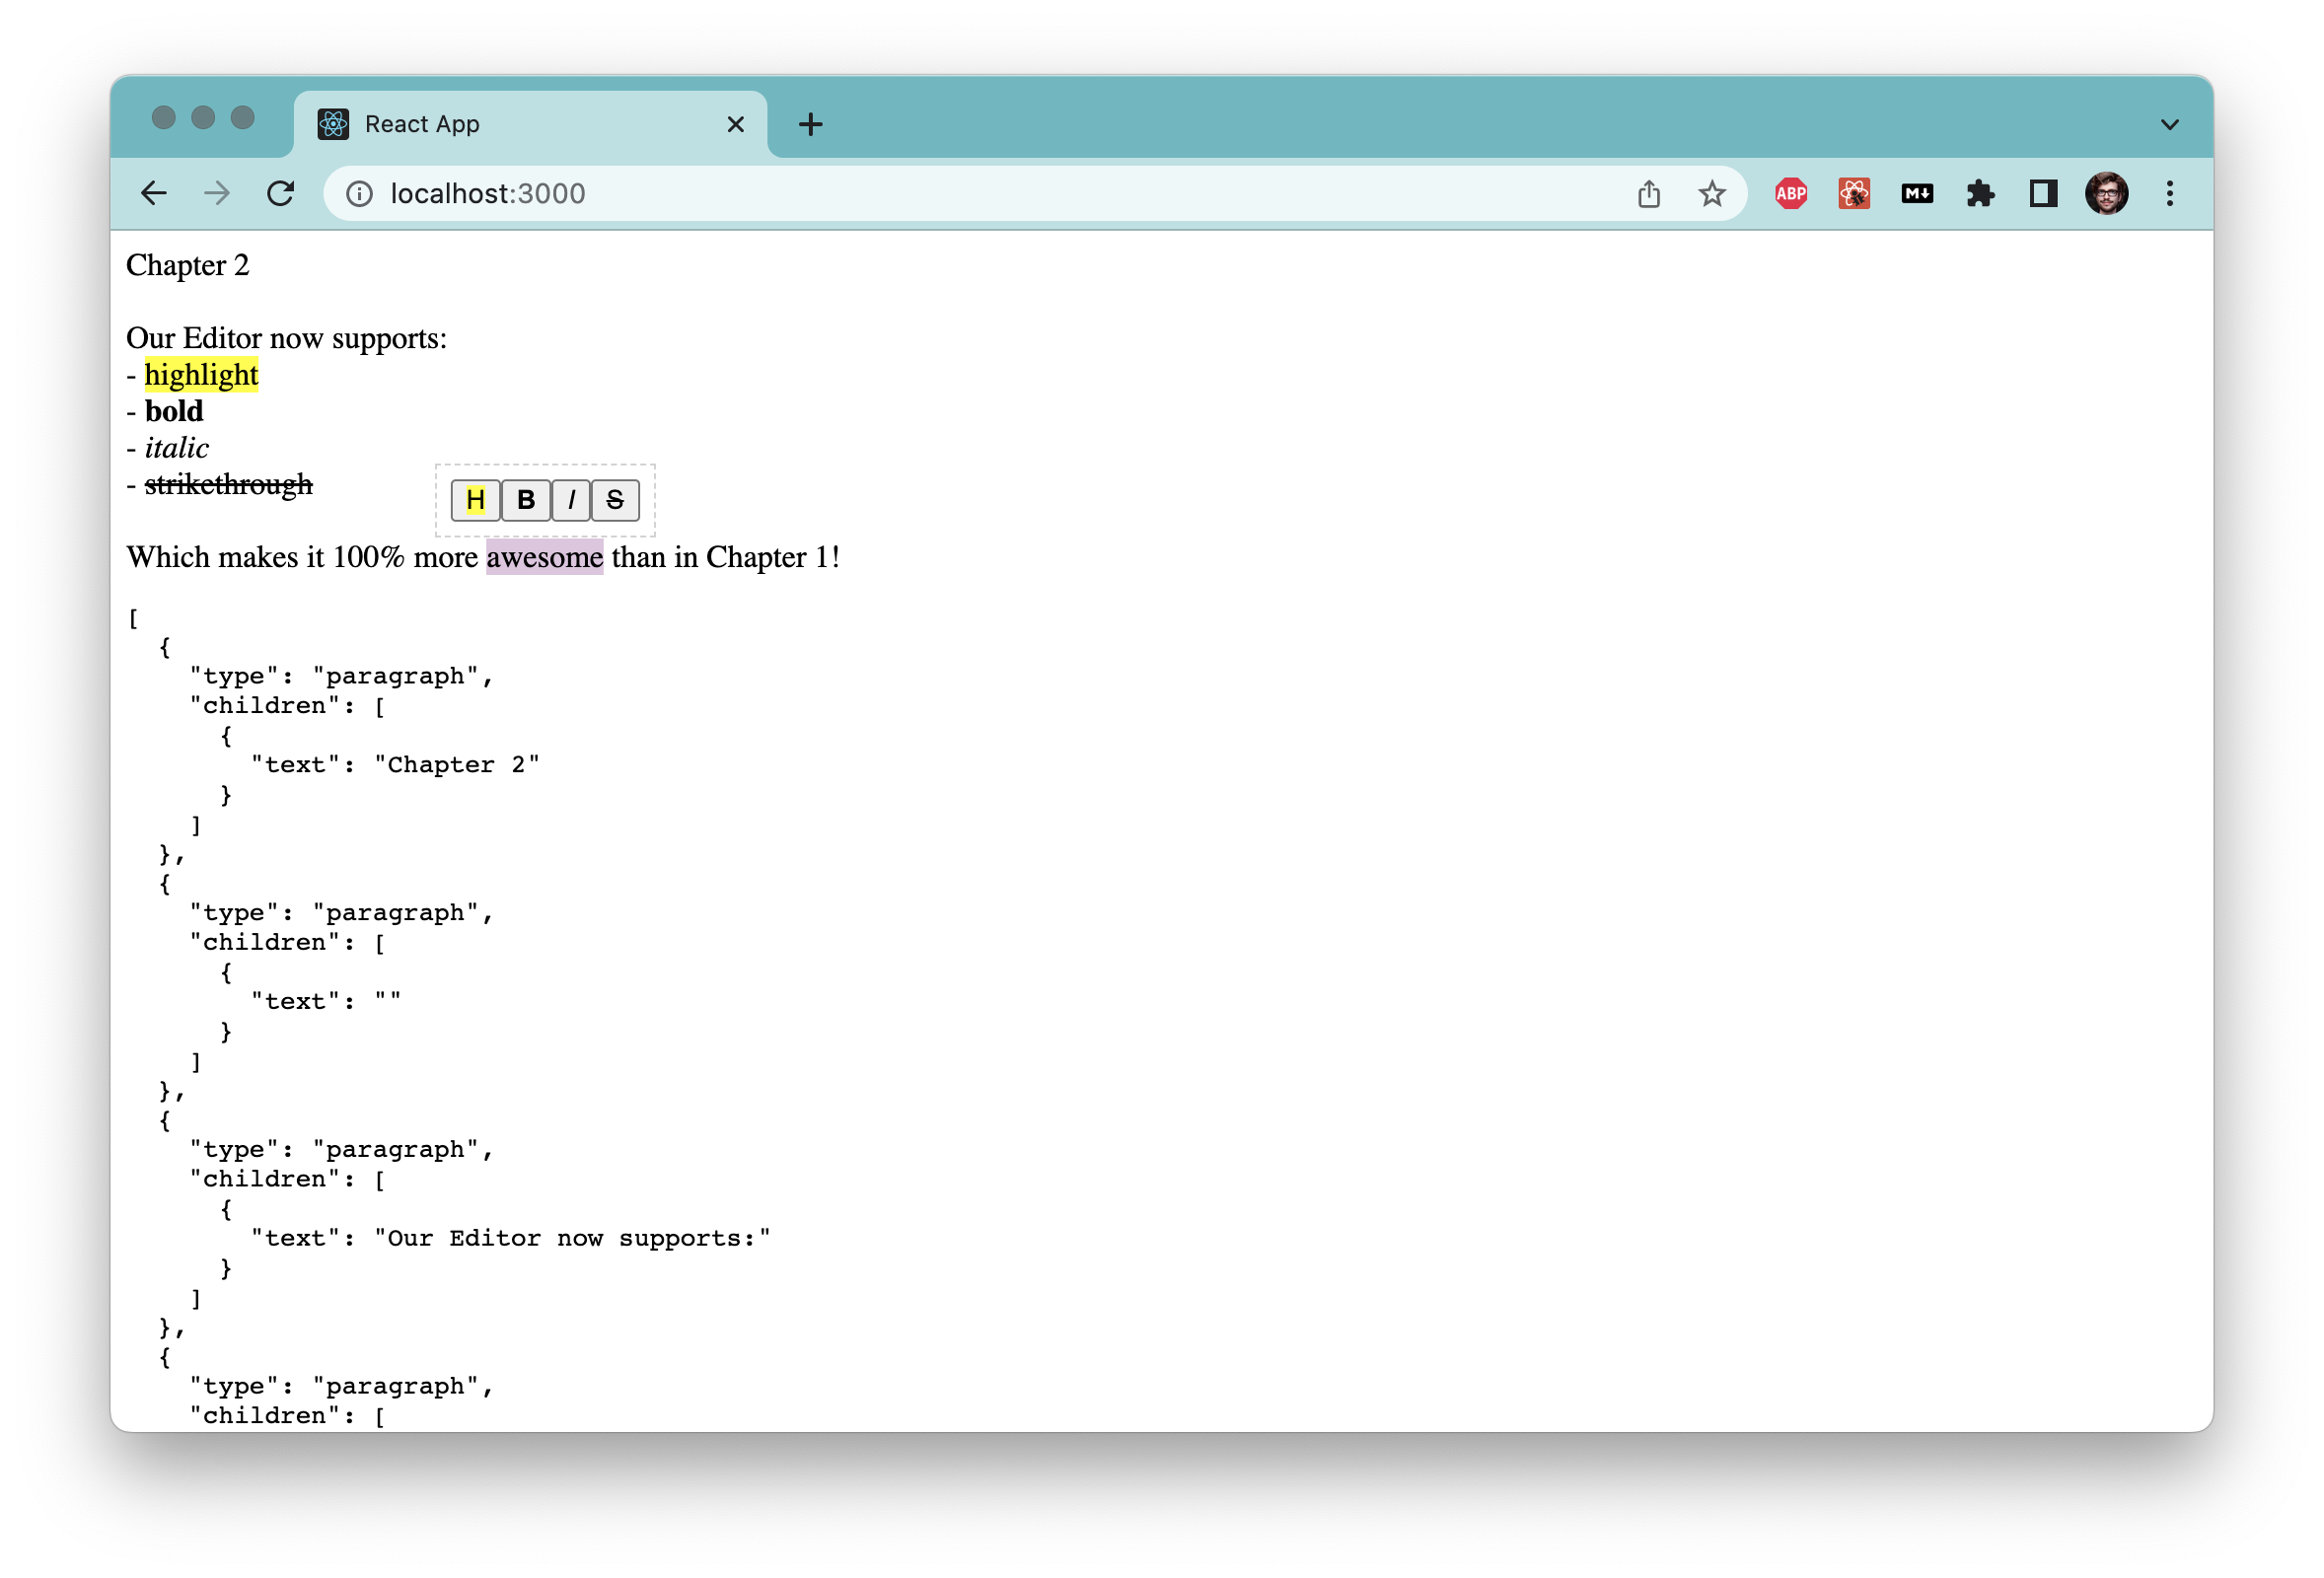
Hovering Toolbar
Now our users are able to change the styling of their text both with hotkeys and shortcuts, which already is pretty nice. But we want to go a bit further than that. Hotkeys and Shortcuts are great for when you are writing text and have your hands on the keyboard, but we also want to offer functionality for when you are scrolling through your text and have your hand on the mouse, and then something catches your eye that you would like to highlight.
We would like to implement a toolbar that hovers in close proximity to where the edit is about to happen, so that the user doesn't need to move their mouse around too much. Also, we want the toolbar only to be visible when some text is selected. As you can see by now, our text editor has a strong keyboard focus - we're not planning to add a toolbar which is always visible.
Let's first implement a toolbar which is not hovering, and which doesn't do anything yet.
//HoveringToolbar.tsx
import { Editor as SlateEditor, Range, Node } from "slate";
import { useFocused, useSlate } from "slate-react";

export default function HoveringToolbar() {
  const editor = useSlate();
  const inFocus = useFocused();
  let isVisible = false;

  const { selection } = editor;

  if (
    inFocus &&
    selection &&
    Range.isExpanded(selection) &&
    SlateEditor.string(editor, selection) !== ""
  ) {
    isVisible = true;
  }
  if (!isVisible) {
    return null;
  }
  return (
    <span
      onMouseDown={(e) => e.preventDefault()}
      style={{ border: "1px dashed lightgray", padding: "7px" }}
    >
      <button>
        <mark>H</mark>
      </button>
      <button>
        <strong>B</strong>
      </button>
      <button>
        <em>I</em>
      </button>
      <button>
        <s>S</s>
      </button>
    </span>
  );
}
This is a very basic toolbar which is nothing more than a span with a few buttons in it. Note that we are calling `event.preventDefault()´ in case of a mouse down event in the toolbar - otherwise, the toolbar would get the focus, the editor would lose it and the toolbar would disappear.
We can access the current editor object with Slate's useSlate hook - which only works if we place the toolbar in the right place, as we will see in a second. The hook useFocused() helps us to determine whether or not the editor currently has focus. With all this in place, the ifstatement ensures that the editor is in focus, there is a selection and the selection is not empty. In all other cases, we return null.
Let's plug this into our existing editor:
export default function Konzept() {
  const [value, setValue] = useState<Descendant[]>(initialValue);
  const [isFocused, setIsFocused] = useState(true); //Keep track of the Editable's focus
  const editor = useMemo(() => withShortcuts(withReact(createEditor())), []);
  return (
    <>
      <Slate
        editor={editor}
        value={value}
        onChange={(value) => setValue(value)}
      >
        {isFocused && <HoveringToolbar />}
        <Editable
          spellCheck
          autoFocus
          onFocus={() => setIsFocused(true)}
          onBlur={() => setIsFocused(false)}
          renderLeaf={renderLeaf}
          onKeyDown={(event) => onKeyDown(event, editor)}
        />
      </Slate>
      <pre>{JSON.stringify(value, null, 2)}</pre>
    </>
  );
}
There are two things to note here: One is that we place our Toolbar below Slate. This ensures that useSlate will return our editor object back to us when we need it. Second, we're manually keeping track of the focus state of the Editable, as in some edge cases, the Editor can lose focus without inFocus picking up on it.
With that, we have a toolbar in place which appears and disappears, but is still stuck in the wrong place. Let's fix that real quick.
import { useRef } from "react";
//...
export default function HoveringToolbar() {
  //...
  const ref = useRef<HTMLSpanElement | null>(null);
  let coordinates = {
    top: 0,
    left: 0,
  };
  const domSelection = window.getSelection();
  const el = ref.current;
  const { selection } = editor;

  if (
    inFocus &&
    selection &&
    Range.isExpanded(selection) &&
    SlateEditor.string(editor, selection) !== "" &&
    domSelection &&
    el
  ) {
    isVisible = true;
    const domRange = domSelection.getRangeAt(0);

    const rect = domRange.getBoundingClientRect();
    const top = rect.top - el.offsetHeight;
    const left = rect.left - el.offsetWidth / 2 + rect.width / 2;
    coordinates = {
      top,
      left,
    };
  }
  return (
    <span
      onMouseDown={(e) => e.preventDefault()}
      ref={ref}
      style={{
        border: "1px dashed lightgray",
        padding: "7px",
        position: "fixed",
        zIndex: 1,
        backgroundColor: "white",
        top: coordinates.top + "px",
        left: coordinates.left + "px",
        visibility: isVisible ? "visible" : "hidden",
      }}
    >
   //...
    </span>
  );
}
What happens here is very interesting from a HTML/CSS perspective, but mostly uninteresting from the perspective of Slate. The end result can certainly be improved - for instance, by preventing that the toolbar is clipped if the selection is at the edge of the browser window. But since this tutorial is about Slate and not about CSS, I won't go too much into detail here.
In summary, what we do is:
- We keep a reference to our toolbar which we need to calculate its position
- We get the current browser selection, construct a rectangle around it and use this and the toolbar reference to calculate the position of our toolbar
- The toolbar gets a
z-indexand a background color to cover the text in the editor.
Now that we have a toolbar, let's make it actually do something.
Let's refactor the buttons into format MarkButtons:
//HoveringToolbar.tsx

//...
const markToButton = {
  bold: <strong>B</strong>,
  italic: <em>I</em>,
  highlight: <mark>H</mark>,
  strikethrough: <s>S</s>,
};

function MarkButton({ mark }: { mark: Mark }) {
  return (
    <button
    >
      {markToButton[mark]}
    </button>
  );
}
//...
export default function HoveringToolbar() {
//...
return (
    <span
      onMouseDown={(e) => e.preventDefault()}
      ref={ref}
      style={{
     //...
       }}
    >
      <MarkButton mark="highlight" />
      <MarkButton mark="bold" />
      <MarkButton mark="italic" />
      <MarkButton mark="strikethrough" />
    </span>
  );
}
Now, let's make our buttons aware of the format. We also need to think about how we deal with mixed selections (e.g. a string which is half bold, half non-bold) - we consider the selection as marked if one text node within the selection is marked. It follows that for half-marked strings, clicking the button should remove the marks first. This is consistent with the behaviour we implemented with the hotkeys.
Finally, we're going to reuse toggleMark to appropriately mark the strings and refactor it into a separate toggleMark.tsx.
//HoveringToolbar.tsx
import toggleMark from "./toggleMark";
//...
const isFormatActive = (editor: Editor, mark: Mark) => {
  return Array.from(
    SlateEditor.nodes(editor, { match: (n) => Text.isText(n) })
  ).some(([e]) => Text.isText(e) && e[mark]);
};
function MarkButton({ mark }: { mark: Mark }) {
  const editor = useSlate();
  const isActive = isFormatActive(editor, mark);
  const style = isActive ? { backgroundColor: "LightSalmon" } : {};
  return (
    <button
      style={style}
      onClick={() => {
        toggleMark(editor, mark); //We refactored this out of withHotkeys.tsx
      }}
    >
      {markToButton[mark]}
    </button>
  );
}
Conclusion
We are now able to work with marked text and have learned a bit about selections and node transformations with Slate. But to fully be able to structure text, we need to be able to add Headings. We will deal with this in the next chapter.